Recording Your Bike Measurements after your bike fit
Getting your bike set up right means knowing your key measurements — not just guessing. Whether you’re dialing in your fit or switching bikes, having accurate reference points makes the whole process smoother.
In this guide, we’ll show you how to take the four main contact point measurements that matter most:
Saddle height
Saddle fore/aft
Reach to hoods
Drop to hoods
You might notice we measure to the hoods, not the center of the bars like some traditional fitters suggest. Here’s why: the center of the bar isn’t actually a contact point unless you’re riding a flat bar or mountain bike. The hoods, on the other hand, are where your hands naturally sit most of the time — we call it your 90% position. So if we want a true picture of your fit, that’s where we measure.
Let’s break down how to capture each of these points accurately.
Step #1 - Saddle Height
To measure your saddle height accurately, start from the center of the bottom bracket (BB) — that’s the middle of the crank axle. Measure in a straight line up to the top middle of the saddle, going through the central axis of the seat tube.
This method provides the most reliable and repeatable measurement, giving you a true saddle height you can reference across bikes or when making adjustments.
Tip: Use a tape measure and take the reading with the bike upright on level ground for best results.

STEP #2 - Saddle Fore/Aft (Setback)
Saddle setback refers to how far behind the bottom bracket your saddle sits. It’s a critical measurement that influences your pedaling efficiency, comfort, and how your body weight is distributed over the bike.
To measure it, you’re essentially finding the horizontal distance from the tip of the saddle to a vertical line that runs through the center of the bottom bracket.
There are two easy ways to do this:
Method 1 – Spirit Level + Tape Measure
Place a long spirit level on the saddle, making sure it’s level. Drop a tape measure or plumb line (string with a weight) from the saddle nose to the ground, and mark that spot. Then measure the horizontal distance from that point back to the bottom bracket axis.Method 2 – Plumb Line + Tape Measure
Hang a weighted string (a plumb line) from the tip of the saddle so it drops straight down. Without needing a spirit level, use a tape measure to measure the horizontal distance from the plumb line to the center of the BB. Same result, just a simpler setup.
This gives you your saddle setback — the horizontal distance behind the BB that your saddle is positioned. It’s a key number to track when changing saddles or seatposts to maintain a consistent position.

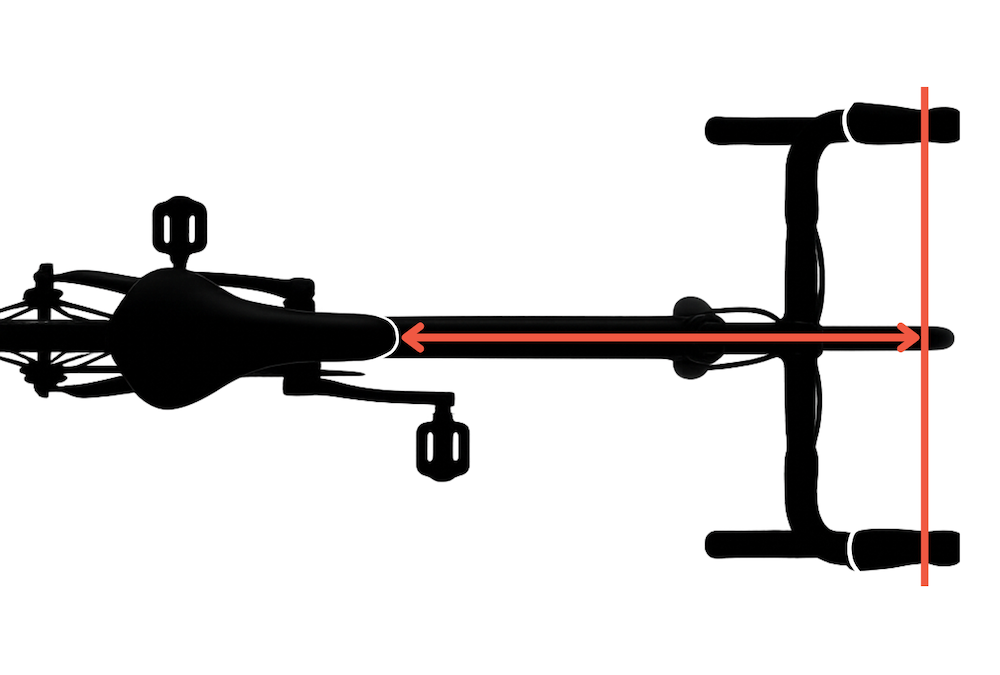
STEP #3 - Reach to The Hoods
Reach to the hoods is the horizontal distance from the tip of your saddle to the front of your brake hoods — one of the most important measurements when it comes to comfort and control on the bike.
You might notice we measure to the hoods, not the center of the bars like some traditional fitters suggest. Here’s why: the center of the bar isn’t actually a contact point unless you’re riding a flat bar or mountain bike. The hoods, on the other hand, are where your hands naturally rest most of the time — we call it your 90% position. So if we want a true picture of your fit, that’s where we measure from.
To measure reach to the hoods:
Place a straight edge (like a meter ruler, level, or even a broomstick) across the tops of both hoods — this represents the line we’re measuring to, like the red line shown in most bike fit diagrams.
Make sure the straight edge is positioned evenly and square to the bike.
Use a tape measure to measure the horizontal distance from the tip of your saddle to the nearest edge of the straight line across the hoods.
This gives you your effective reach — not to the frame or the bars, but to where your hands actually sit. It’s a great number to record and reference, especially if you’re dialing in your position or comparing setups.
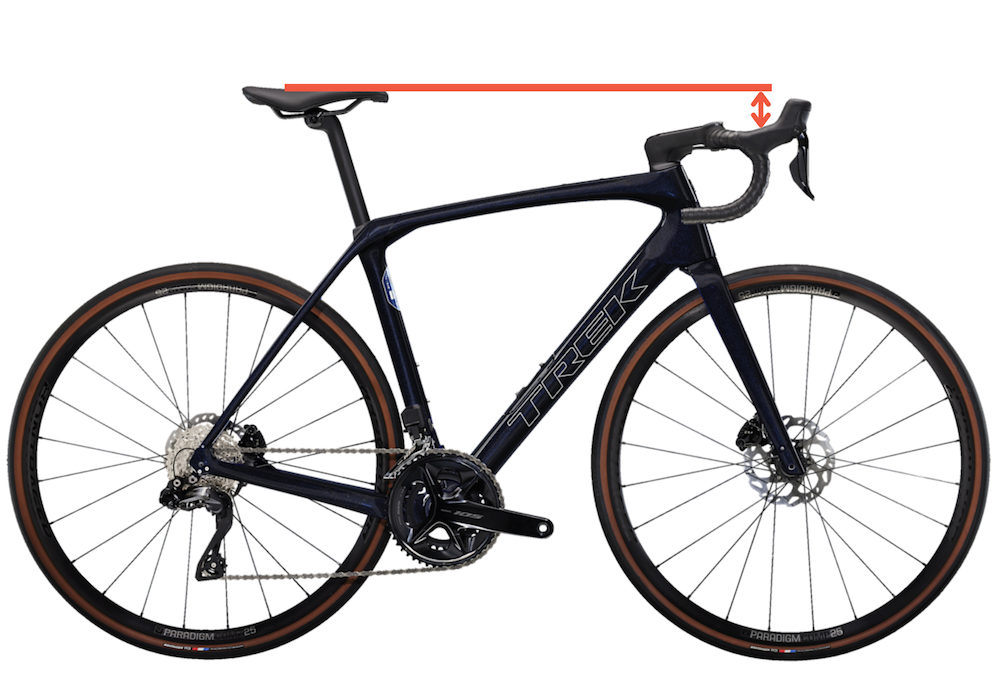
STEP #4 - Drop to the hoods
The Drop to the hoods is the vertical difference between your saddle height and the hood position. It affects your posture, weight distribution, and how aggressive or relaxed your front-end position feels.
There are two simple ways to measure this:
Method 1 – Spirit Level + Tape Measure
Place a spirit level on the saddle and hold it level toward the hoods. Where the level crosses over the hoods, use a tape measure to check the vertical drop between the saddle and the top of the hoods (specifically the lower curve, where your palm naturally sits). This gives you a direct saddle-to-hood drop measurement.Method 2 – Floor-to-Contact Point Method
Use a tape measure to:Measure from the floor to the top middle of the saddle.
Measure from the floor to the top of the lower curve of the hoods (where your hands naturally rest).
Subtract the hood height from the saddle height to get your drop to hoods.
Both methods work — use whichever is easier with the tools you have. Just be sure the bike is on level ground and upright for accuracy. This measurement is especially useful when trying to match your position between bikes or fine-tune front-end comfort.